This Quickstart will walk you through how to get Cello integrated in 4 easy steps, if you are using Chargebee as the payment gateway.
By the end of this guide, you'll have Cello implemented end-to-end including:
- Adding Referral component to your app
- Tracking attributions on your landing page
- Tracking signups with Chargebee
- Sending signup and transaction events to Cello using Chargebee Webhook
Lets get started 🚀
0. Sign in to Cello
Go to Cello Portal and login to access your product dashboard.
1. Add Referral component to your app
Before you begin, you need:
- Product ID (
productId) - Identifier of the product your users will refer. You can access it in you product dashboard on Access Keys page.
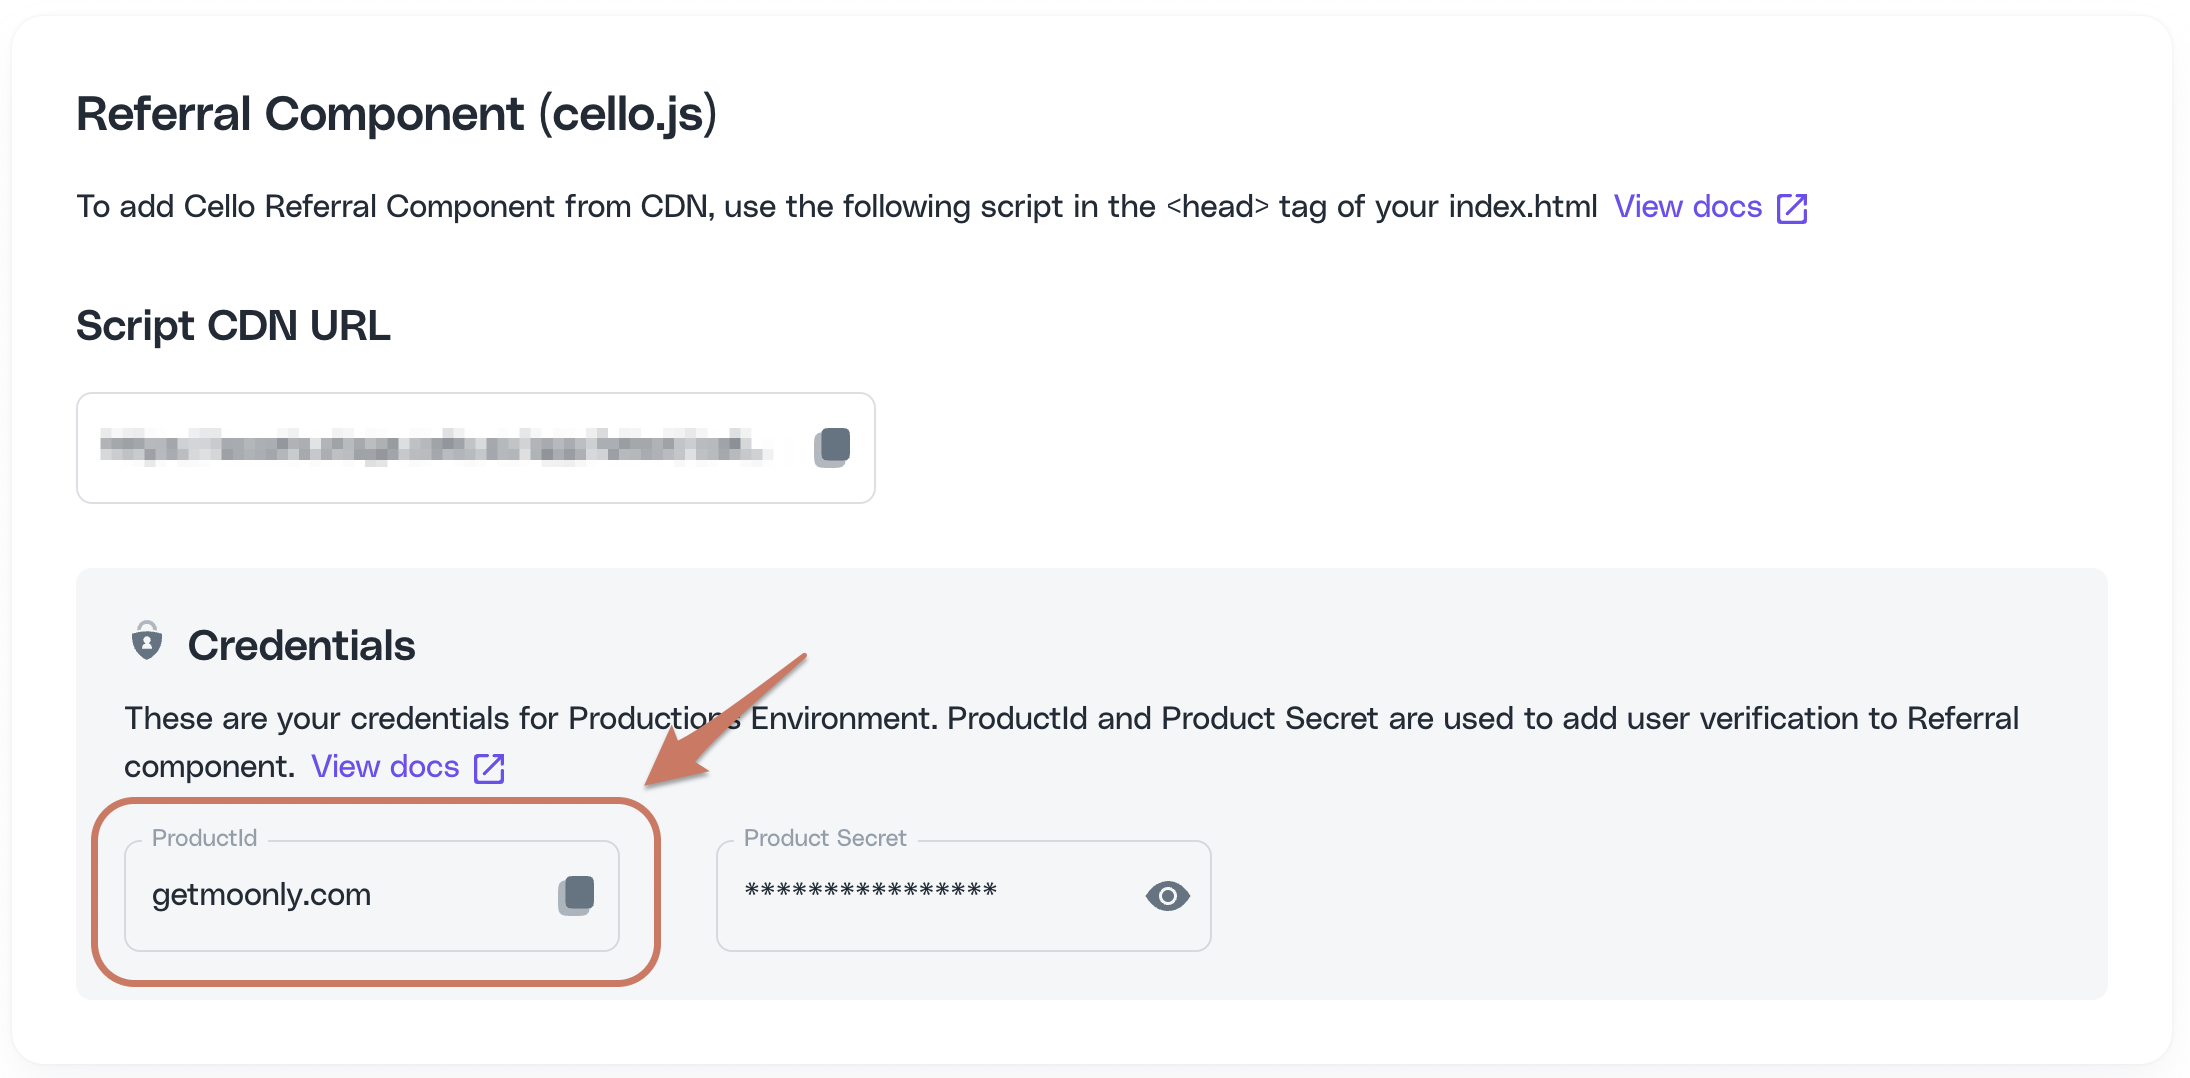
- Product User ID (
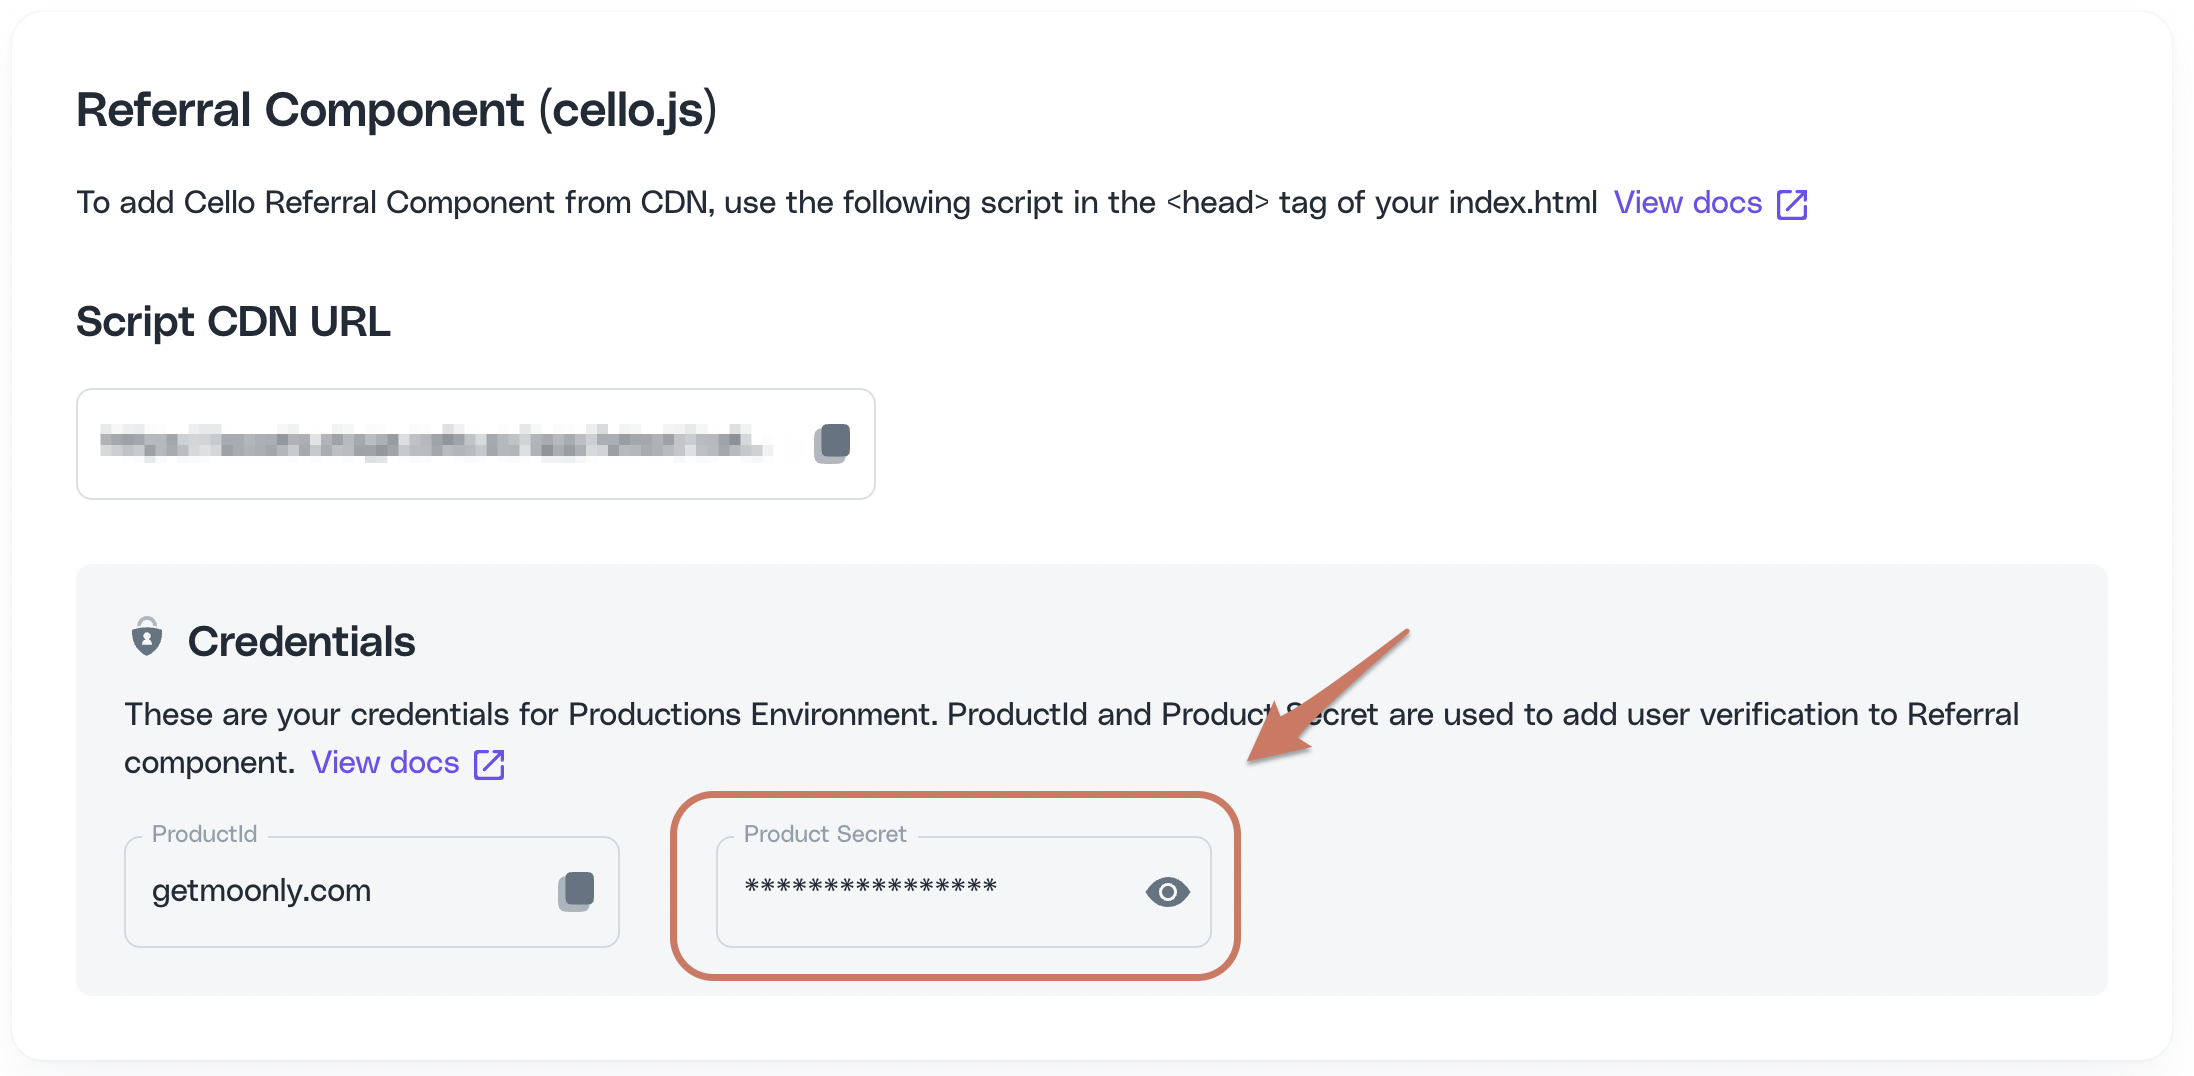
productUserId) - The unique identifier for your users. ❗It is important that this ID is unique per user, rather than organisation. - Product Secret (
PRODUCT_SECRET) - Provided in section 4 of your onboarding workspace
Include Cello JS library
To add Cello Referral Component from CDN, use the following script in the head tag of your index.html
xxxxxxxxxx<script type="module" src="https://assets.sandbox.cello.so/app/v2/latest/cello.js" async></script>Add user authentication with JWT token
Generate a JWT token
Never generate a token or store your secret on the client side
xxxxxxxxxximport { sign } from 'jsonwebtoken'; const SECRET = 'PRODUCT_SECRET'; // your PRODUCT_SECRET const tokenPayload = { productId: 'YOUR_PRODUCT_ID', // your productId productUserId: 'CURRENT_USER_ID', // your user unique identifier}; const token = sign(tokenPayload, SECRET, { algorithm: 'HS512',}); console.log(token);Initialize the Referral component
Now, we can initialize the Referral component with the JWT token we just generated
xxxxxxxxxxwindow.cello = window.cello || { cmd: [] }; window.cello.cmd.push(async function (cello) { try { await cello.boot({ productId: 'CELLO_PRODUCT_ID', token: 'REPLACE_ME', language: "en", productUserDetails: { firstName:'Bob', //optional lastName:'Bobsky', //optional fullName:'Bob B Bobsky', //optional email: 'bob@gmail.com' //optional } }); } catch (error) { console.error("Failed to boot cello:", error); // Handle the error appropriately }});Now, reload your application and you should see the Cello button appear. You can now try out the referrer experience.
💡 Don't want to use the Cello button? Use custom launcher to open Referral component from a menu item or a button in your app.
Let's move on to new user experience and referral tracking 👉
2. Track attributions on your landing page
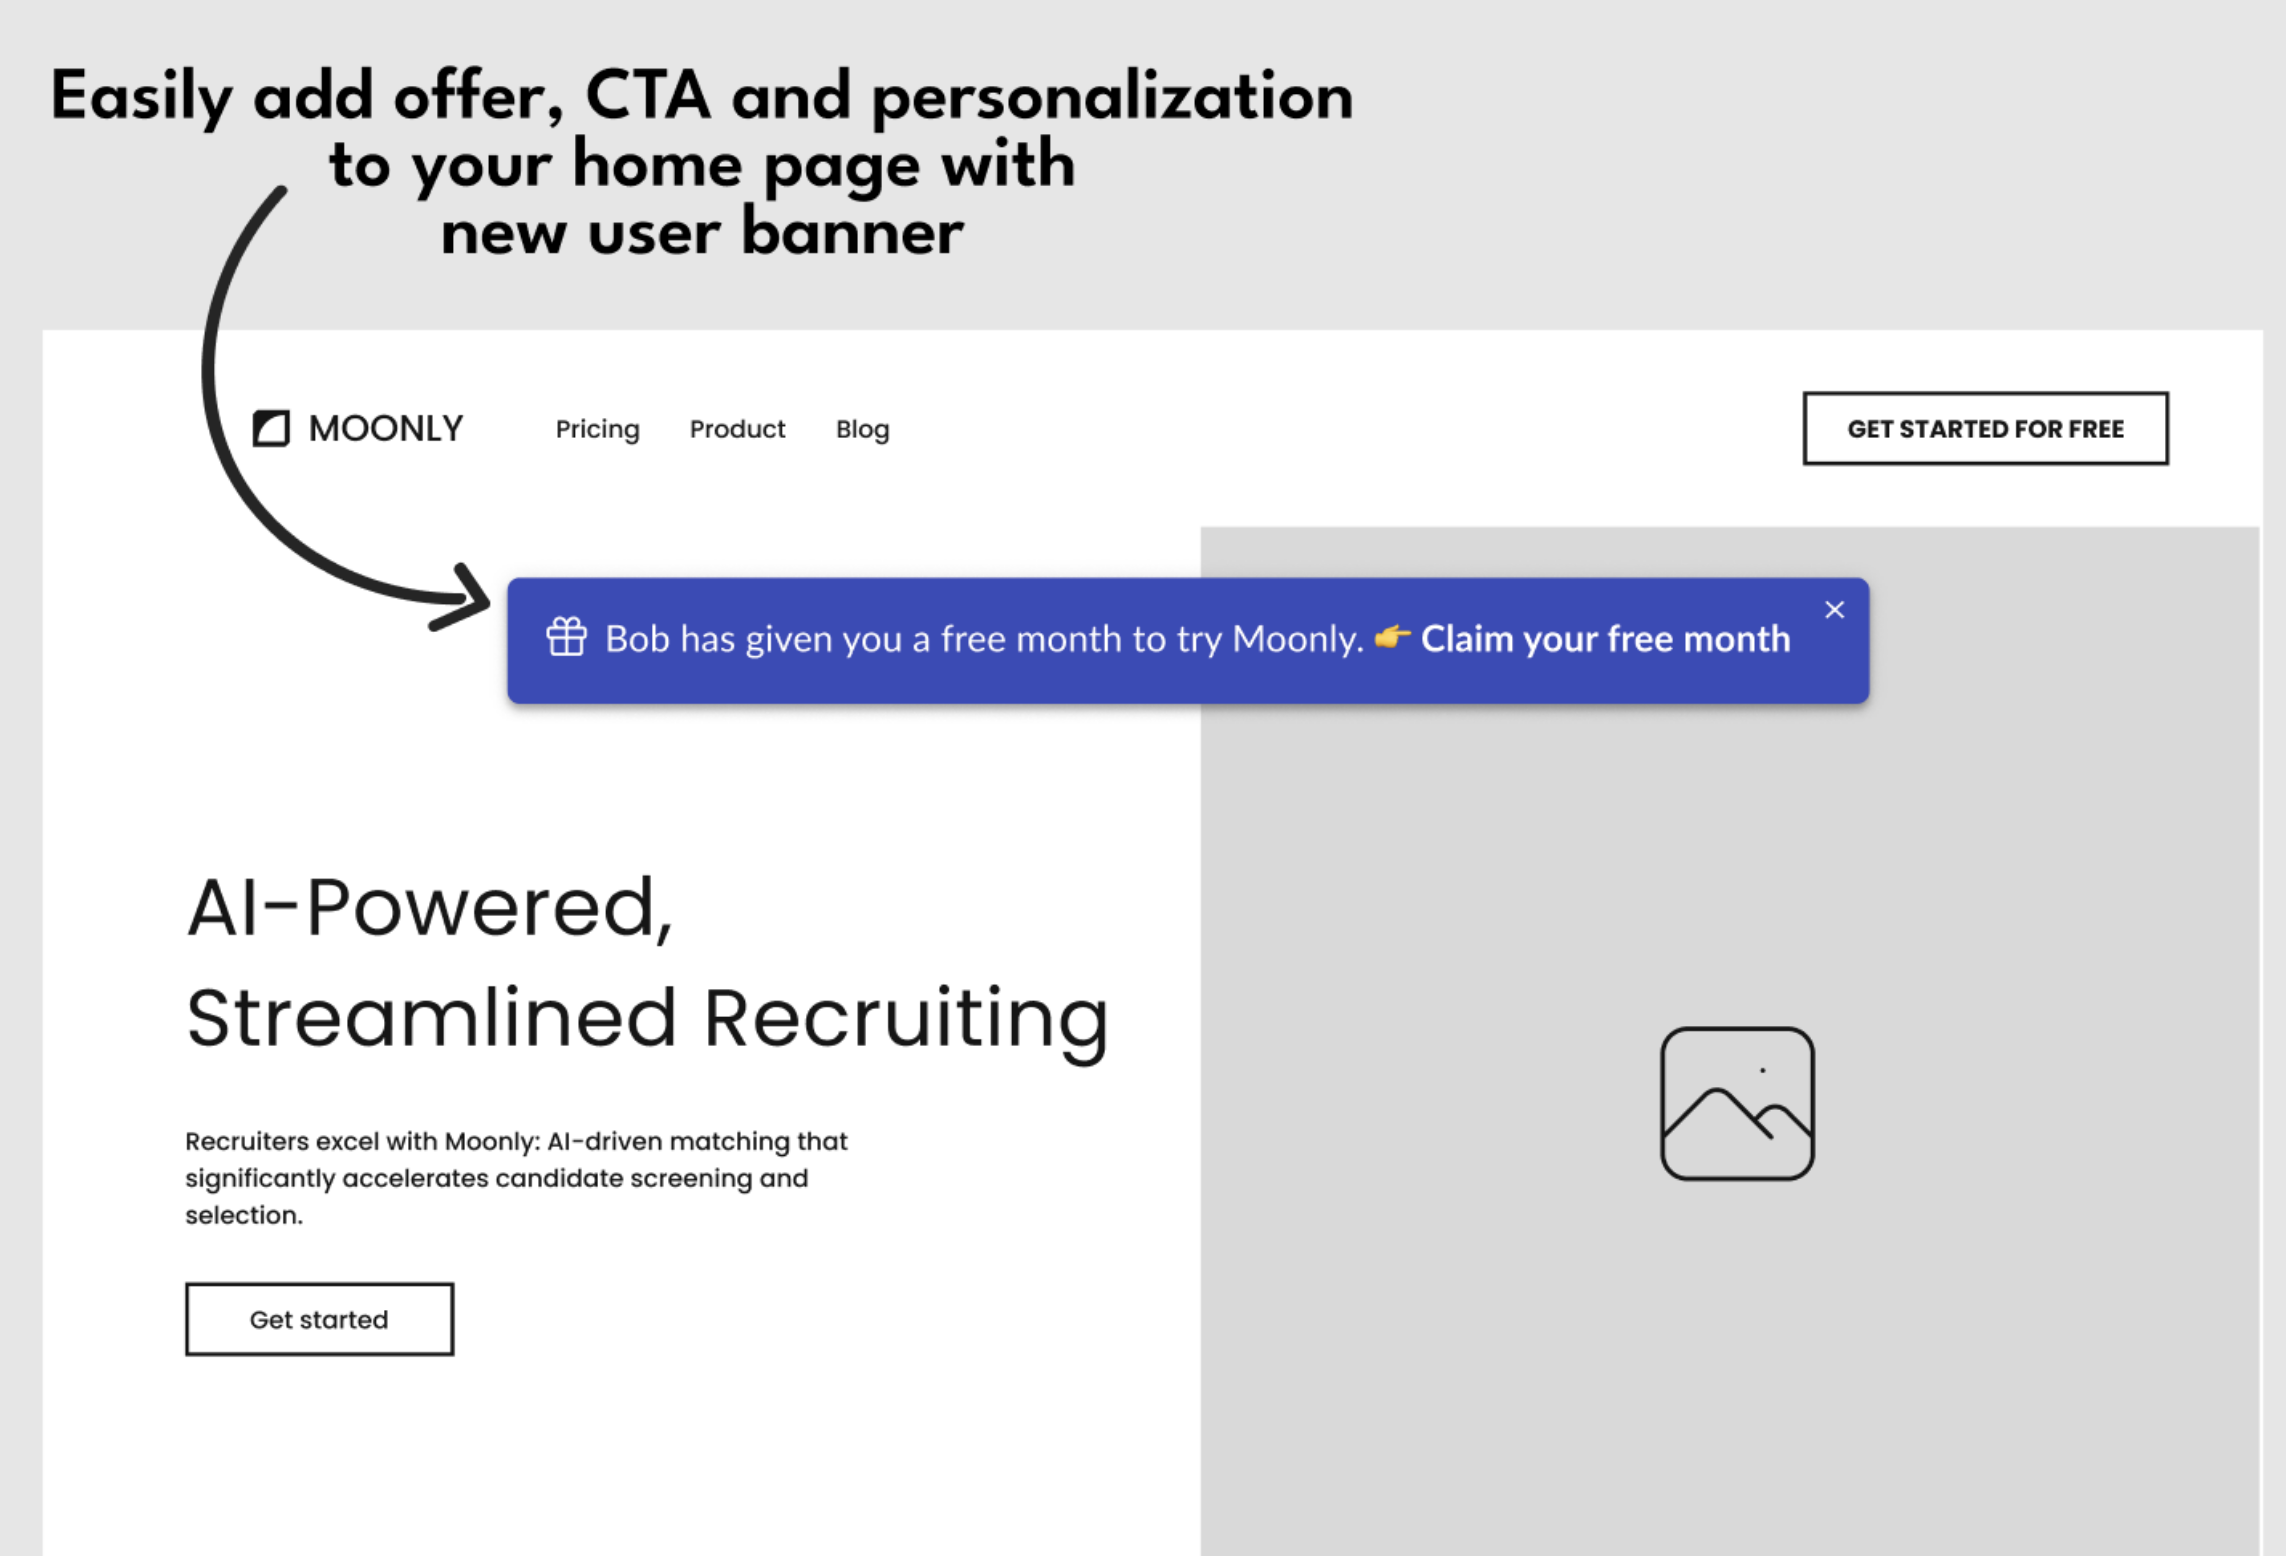
You will need to configure which page the referred user lands on when clicking on the invite link, shared with them by the referrer. The easiest option is to use your Home page as landing page with a standard New user banner, to show the offer to the new user.
💡 Learn about other options for landing pages in this guide
To configure it:
- Go to Cello Portal New User experience page.
- Choose "Custom landing page" and add your Home page URL.
- In the "Personalized message" tab, check "Show new user banner" and other settings and save.
- Add Attribution library to your Home page by including the following script in the
<head>tag to track attributions and show New user banner.
xxxxxxxxxx<script type="module" src="https://assets.cello.so/attribution/latest/cello-attribution.js" async></script>Now, if you visit an invite link of any referrer, you will be redirected to your Home page and will see the New user banner.
3. Track signups with Chargebee
When a signup finally happens, you need to make sure that a ucc code, identifying the referrer, is saved to the new user record and passed to Chargebee upon customer creation.
Access Ucc code during signup
Ucc is present in the URL of your Home page when a new user is redirected to it from the invite link and in the cookies, added by the Attribution library.
To access the ucc during signup, you can use the Attribution library JS method getUcc().
Here is how to do it:
- Add the following javascript code before any of the calls to the library to avoid race conditions.
window.CelloAttribution=window.CelloAttribution||async function(t,o){if("getReferral"===t)throw new Error("getReferral is not supported in this context. Use getUcc instead.");let e,n;const i=new Promise((t,o)=>(e=t,n=o));return(window.CelloAttributionCmd=window.CelloAttributionCmd||[]).push({command:t,args:o,resolve:e,reject:n}),i};xxxxxxxxxx// if in async functionconst ucc = await window.CelloAttribution('getUcc'); // otherwise window.CelloAttribution('getUcc').then((result) => { const ucc = result;})Add metadata to Chargebee customer
Chargebee webhook supports custom fields (CF). You can choose to use metadata or custom fields to add referral data to the event. Learn more about custom fields in the Chargebee documentation
Next, at the point when you create a customer in Chargebee, make sure that you add the following metadata to the Chargebee customer:
- cello_ucc - ucc, a referral code identifying the referrer
- new_user_id - a unique user ID in your system, identifying the new user who just signed up. This should be the same ID (productUserId) you will use to boot the Referral component, when this user logs into your app
- new_user_organization_id (optional) - add this, if your referrers can refer an organization rather then a single user and you want to reward based on that.
Below is an example for a NodeJS app, illustrating how to include during customer creation.
xxxxxxxxxxvar chargebee = require("chargebee"); chargebee.configure({site : "getmoonly-v3-test", api_key : "test_jqXGuQLkBHUSR2PM0qgUV21W1VqSFJIU"});chargebee.customer.create({ first_name : "Bob", last_name : "Bobsky", //... // other customer fields //... meta_data: { cello_ucc: "hdz7afhs7", new_user_id: "xcsdad", // product user id of the new user new_user_organization_id: "123456" }// ..// })Now, the final step - sending signup and transaction data to Cello 👉
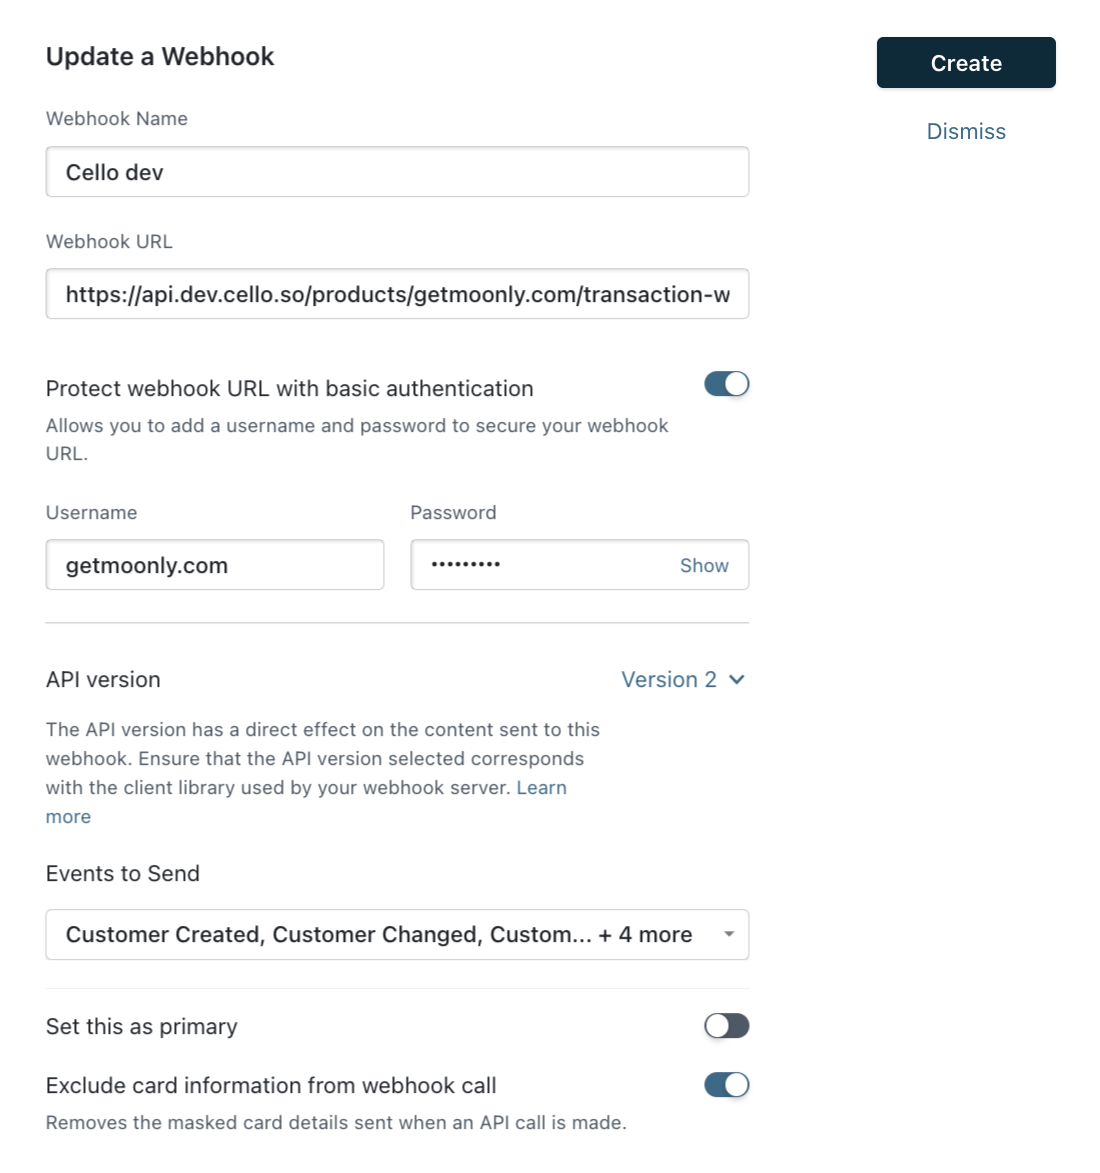
4. Send signup and transaction events to Cello with Chargebee Webhook
You will add a Webhook to your Chargebee configuration to connect Chargebee and Cello. This can be done in both test and production environments separately.
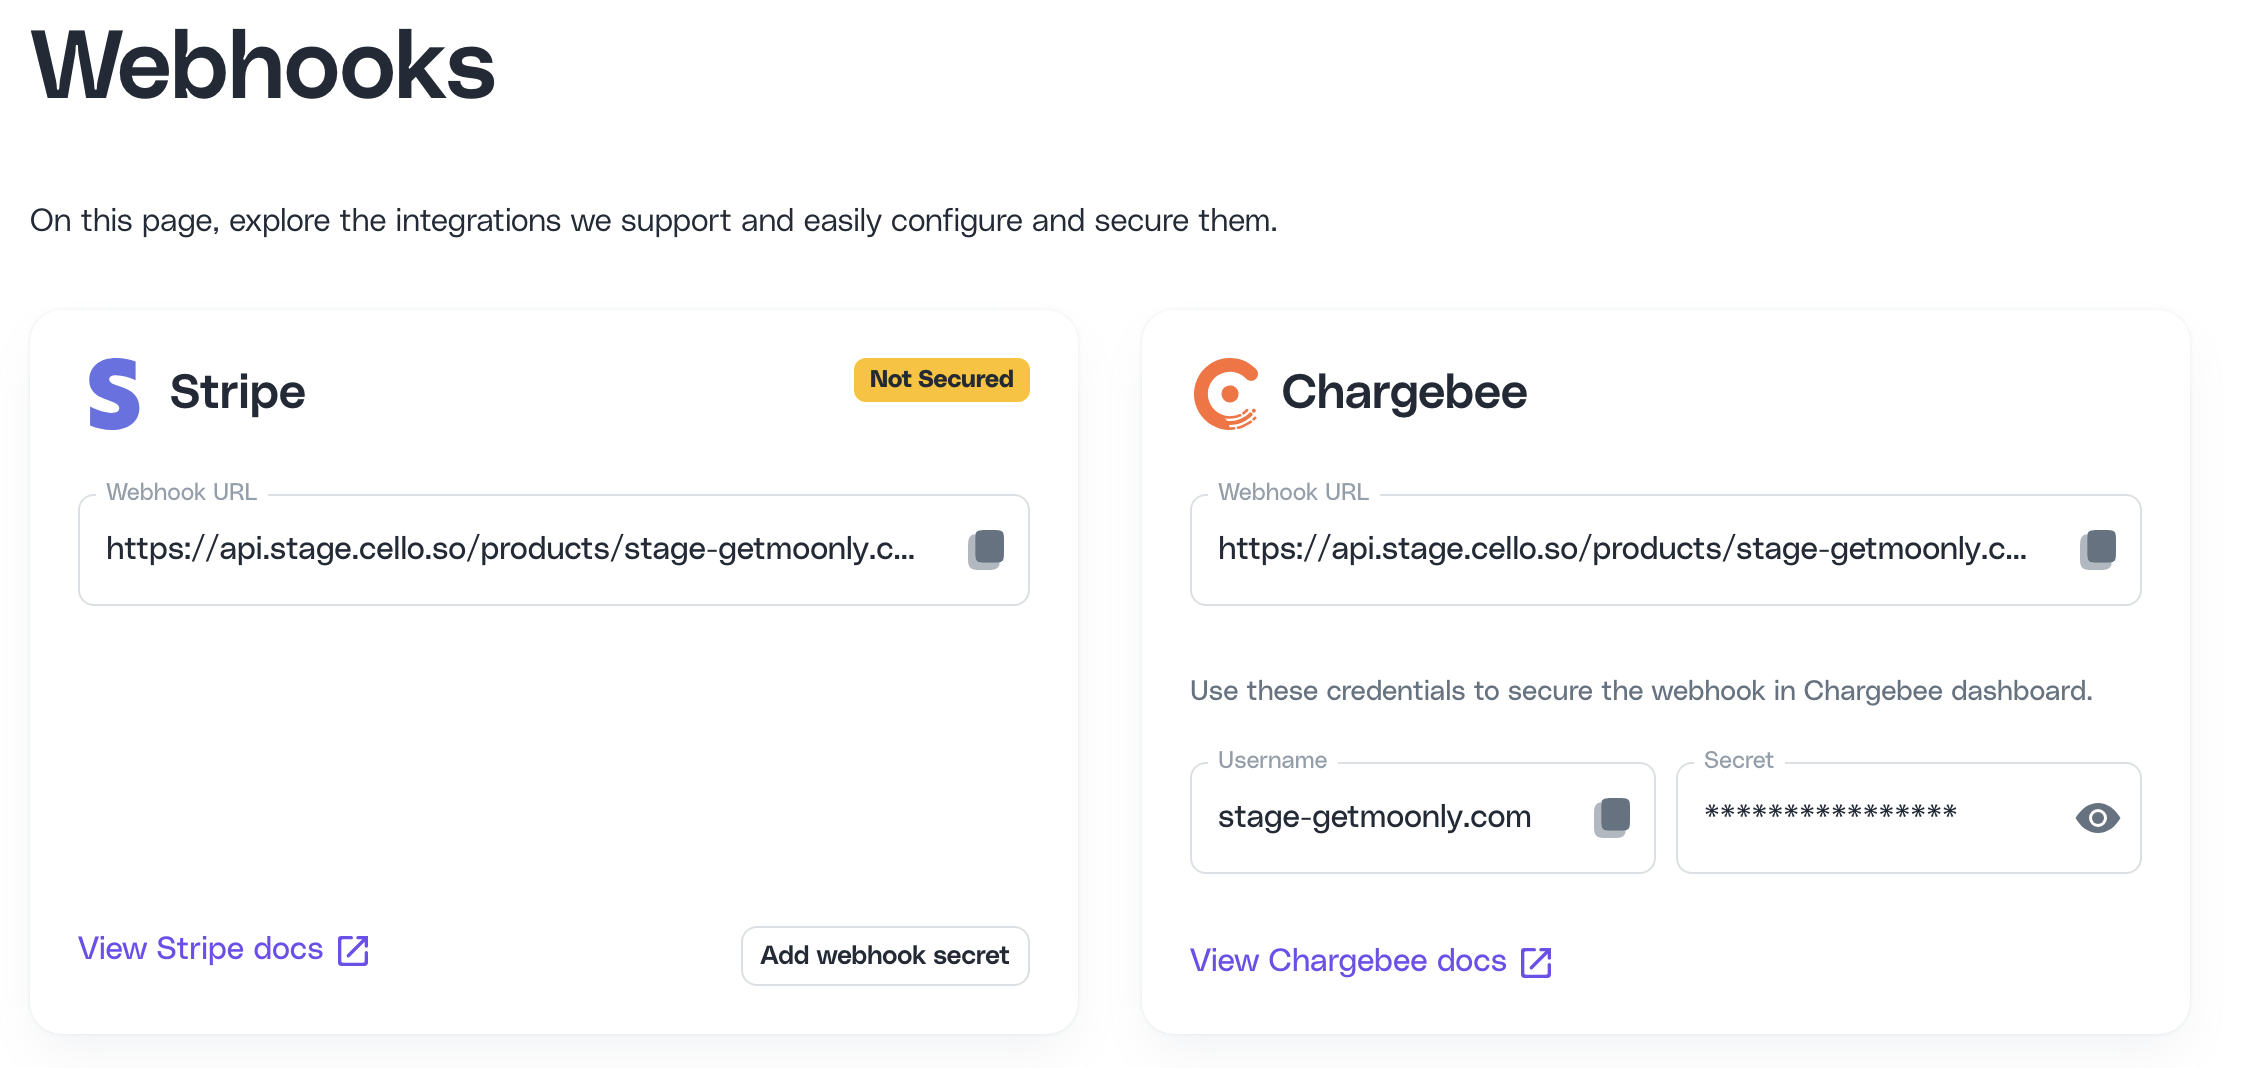
To set up:
Log in to Cello Portal and go to Webhooks to get your endpoint URL and authentication details.
Log in to your Chargebee dashboard.
From the sidebar, select Settings > Configure Chargebee and click on Webhooks.
Click on "+ Add Webhook" and fill out the Endpoint URL provided based on the environment.
Select the events you want to send under "Events to Send." Select the events
- customer_created, customer_changed, customer_deleted
- subscription_created, subscription_changed, subscription_deleted
- payment_succeeded, p ayment_refunded
To secure the webhook, select Protect webhook URL with basic authentication and add the
usernameandsecretprovided in the Cello Portal.Be sure to select Exclude card Information from webhook call
Finally click Create to enable the webhook
Endpoint created 🎉
Congratulations! You are done and now able to try out the full Cello referral experience 🎉